User Guide
Django River ML allows you to easily deploy river online machine learning for a Django project. It is based off of chantilly with hopes of having similar design. We include example clients and a test application in tests. We are excited about what you might build with this, and please give us a ping. if you have a question, find a bug, or want to request a feature! This is an open source project and we are eager for your contribution. 🎉️
Quick Start
Once you have django-river-ml installed (Installation) you
can do basic setup.
Setup
Add it to your INSTALLED_APPS along with rest_framework
INSTALLED_APPS = (
    ...
    'django_river_ml',
    'rest_framework',
    ...
)
Add django-river-ml’s URL patterns:
from django_river_ml import urls as django_river_urls
urlpatterns = [
    ...
    url(r'^', include(django_river_urls)),
    ...
]
If you use something like Django Rest Swagger
for yur API documentation, registering the django_river_urls alongside your app should render
the endpoints nicely in the user interface! E.g., to extend the above, we might have a set of
API views (to show up in docs) and server views (to not show up):
from django_river_ml import urls as django_river_urls

from rest_framework_swagger.views import get_swagger_view
schema_view = get_swagger_view(title="Spack Monitor API")

server_views = [
    url(r"^api/docs/", schema_view, name="docs"),
]

urlpatterns = [
    ...
    path("", include("django_river_ml.urls", namespace="django_river_ml")),
    url(r"^", include((server_views, "api"), namespace="internal_apis")),
    ...
]
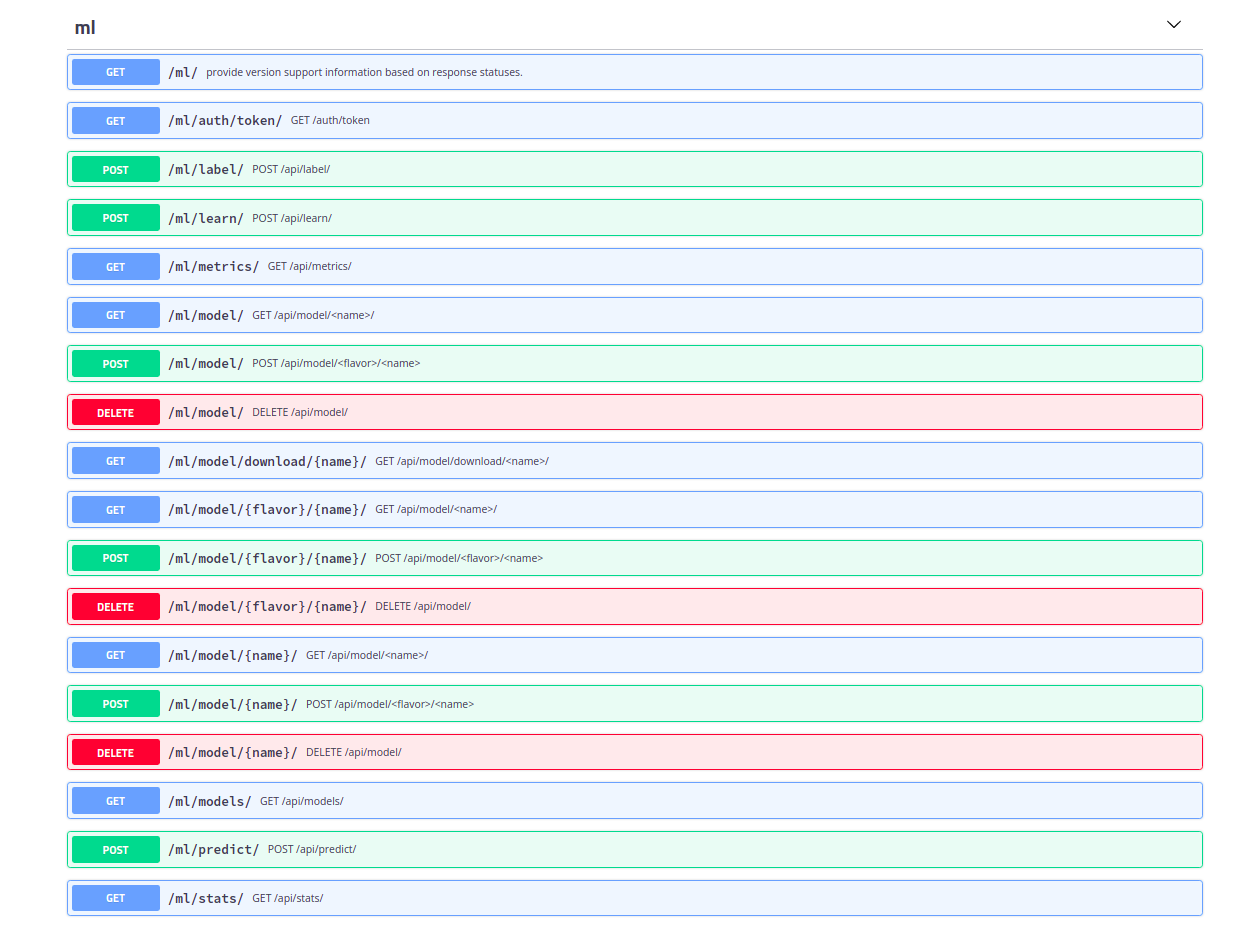
And this will render the Django River ML API alongside your other API prefixes. For example, here is Django River ML deployed under “ml”:
Settings
It is highly recommended that you minimally set these settings in your app settings.py and do not use the default of the plugin:
Name |
Default |
Description |
Example |
|---|---|---|---|
|
$root |
Base directory for storing secrets and cache. Defaults to the root of the module installation (recommended to change) |
|
|
None |
Secret key for shelve (if |
fgayudsiushfdsfdf |
|
None |
Secret key for json web tokens (if authentication enabled, and will be generated if not found) |
fgayudsiushfdsfdf |
The following additonal settings are available to set in your settings.py:
Name |
Default |
Description |
Example |
|---|---|---|---|
|
api |
The api prefix to use for the endpoint |
river |
|
shelve |
The storage backend to use, either shelve or redis (requires redis setup) |
redis |
|
river-redis |
The redis database name, only used if |
another-name |
|
localhost |
The redis host name, only used if |
redis-container |
|
6379 |
The redis port, only used if |
1111 |
|
None (and then is set to |
The cache directory for tokens, recommended to set a custom |
/opt/cache |
|
True |
Always generate identifiers for predictions. If False, you can still provide an identifier to the predict endpoint to use. |
True |
|
True |
For views that require authentication, disable them. |
True |
|
Domain used in templates, and api prefix |
||
|
600 |
The number of seconds a session (upload request) is valid (10 minutes) |
6000 |
|
600 |
The number of seconds a token is valid (10 minutes) |
6000 |
|
10000/1day |
View rate limit using django-ratelimit based on ipaddress |
100/1day |
|
True |
Given that someone goes over, are they blocked for a period? |
False |
|
True |
Globally disable rate limiting (ideal for development or for a heavily used learning server) |
False |
|
|
Provide a list of view names (strings) to enable. If not set (empty list or None) all are enabled. |
|
Custom Models
Django River ML has support for custom models, where a custom model is one you’ve defined in your application to use with river. In order for this to work, you will need to define your model somewhere in your app so it is importable across Django apps (e.g., and when Django River ML tries to unpickle a model object of that type, it will be found). If needed, we can further define a custom set of classes in settings that can be looked for via importlib, however the simple approch to define it in your app or otherwise install a module that makes it importable is suggested.
Custom models currently support stats but not metrics, and metrics could be supported
if we think about how to go about it. the CustomModel flavor is designed to be mostly
forgiving to allow you to choose any prediction function you might have, and we can extend this
if needed.
API Views Enabled
If you want to disable some views, you can set of a list of views to enable using
API_VIEWS_ENABLED. As an example, let’s say we are going to have learning
done internally, and we just want to expose metadata and prediction endpoints.
We could do:
DJANGO_RIVER_ML = {
    ...
    # Only allow these API views
    "API_VIEWS_ENABLED": ['predict', 'service_info', 'metrics', 'models', 'model_download', 'stats']
    ...
}
The views to choose from include:
auth_token
service_info
learn
predict
label
metrics
stream_metrics
stream_events
stats
model_download
model
models
Note that “model” includes most interactions to create or get a model.
For more advanced settings like customizing the endpoints with authentication, see the settings.py in the application.
Authentication
If you have DISABLE_AUTHENTICATION set to true, or you customize the settings AUTHENTICATED_VIEWS to change
the defaults, then you shouldn’t need to do any kind of authentication. This might be ideal for a development or
closed environment that is only accessible to you or your team. However, for most cases you are strongly encouraged to
have authentication. Authentication will require creating a user, to which Django River ML will add a token generated
by Django Restful, if not already generated. For purposes of example, we can quickly create a user as follows:
python manage.py createsuperuser
Username (leave blank to use 'dinosaur'):
Email address:
Password:
Password (again):
Superuser created successfully.
And at this point, you can also ask for the token.
python manage.py get_token dinosaur
Enter Password:
xxxxxxxxxxxxxxxxxxxxxxxxxxxxxxxxxxxxxxx
You can then export this token in the environment to be found by the river api client.
export RIVER_ML_USER=dinosaur
export RIVER_ML_TOKEN=xxxxxxxxxxxxxxxxxxxxxxxxxxxxxxxxxxxxxx
Otherwise you will need to manually go through a standard OAuth2 workflow of using basic
auth to look for a 401 response with a Www-Authenticate header, parsing that to find the “realm”
(the authentication server) and then making a request to that endpoint with the base64 encoded user and token
in the Authenticate header. It’s much easier to use the client to do it for you, which will cache your token
(until it expires and you need to request a new one automatically).
Of course if you have a Django interface with OAuth for login, you can make a settings or profile page to easily retrieve the same token. Open an issue if you need guidance to do this. We might consider adding a front-end view to provide by default if it’s desired.
Sample Application
An example app is provided that you can use to test. Once you have your environment setup, you can do:
$ python manage.py makemigrations
$ python manage.py migrate
$ python manage.py runserver
In another terminal, you can then run a sample script:
$ python examples/regression/run.py
$ python examples/binary/run.py
$ python examples/multiclass/run.py
$ python examples/cluster/run.py
$ python examples/custom/run.py
Note that creme models are supported, but with minimum functionalty (no metrics)
and you must install creme on your own.
$ python examples/creme/run.py
Testing
Running tests with the example server is also fairly easy!
python runtests.py
Interaction from Inside your Application
While a user is going to be interacting with your API endpoints, you might want to
interact with models from within your Django application. This is possible
by interacting with the DjangoClient directly, which wraps the database
and is exposed to the API via a light additional wrapper. The following examples can walk
you through the different kinds of interactions. For all interactions, you’ll
wait to create a client first:
from django_river_ml.client import DjangoClient
client = DjangoClient()
This also means you can choose to not add the Django River URLs to your application
and have more control over your ML interactions internally. You can also take an approach
between those two extremes, and just expose a limited set using the API_VIEWS_ENABLED
setting. When empty, all views are enabled. Otherwise, you can set a custom set of names to
enable (and those not in the list will not be enabled).
Note
We are planning to allow retrieving a model from version control, e.g., given that you are starting a Kubernetes run of Spack Monitor (which will need to use redis to store model information) and the model is not found.
Get Models
To get models, simply ask for them! This will return a list of names to interact with further.
client.models()
['milky-despacito', 'tart-bicycle']
Create a Model
If you want your server to create some initial model (as opposed to allowing users to upload them) you can easily do that:
from river import feature_extraction, cluster
model_name = "peanut-butter-clusters"
model = feature_extraction.BagOfWords() | cluster.KMeans(
    n_clusters=100, halflife=0.4, sigma=3, seed=0
)
model_name = client.add_model(model, "cluster", name=model_name)
You could also do the same from file, meaning a pickled model you’ve created elsewhere.
import pickle
model_name = "peanut-butter-clusters"
with open('%s.pkl' % model_name, 'rb') as fd:
    model = pickle.load(fd)
model_name = client.add_model(model, "cluster", name=model_name)
Or if your application has automatically created an “empty” model with your desired name (the default when enabled), you can delete it first and do the same.
client.delete_model(model_name)
import pickle
with open('%s.pkl' % model_name, 'rb') as fd:
    model pickle.load(fd)
model_name = client.add_model(model, "cluster", name=model_name)
Delete a Model
You can delete a model by name.
client.delete_model("tart-bicycle")
True
Get Model
Of course to retrieve the model directly, you can do:
model = client.get_model("spack-errors")
Keep in mind you are holding onto the model in memory and will need to again save it.
client.save_model(model, "spack-errors")
Note that if you are doing standard predict or learn endpoints, you can simply provide the model name and you don’t need to worry about retrieving or saving (the function handles it for you!). If, however, you want to save a model to file (pickle to be specific) you can do:
client.save_picke("spack-errors", "spack-errors.pkl")
You can also load a model (this only loads a pickle and does not save anything to a database):
model = client.load_model("spack-errors.pkl")
Stats and Metrics for a Model
The one drawback of uploading a model is that you won’t have stats or metrics populated. You simply cannot, given that the learning happened elsewhere, and is normally done on the server to get these metrics. However, once you’ve done more learning you can ask for stats or metrics:
client.stats("spack-errors")
client.metrics("spack-errors")
Interactive Learn
You’ll generally need to provide the model name and features, although if you provide an identifier these things can be looked up.
client.learn(
    model_name,
    ground_truth=ground_truth,
    prediction=prediction,
    features=features,
    identifier=identifier,
)
Interactive Label
To do a labeling (post learn) you’ll need to provide the label, the identifier, and the model name.
client.label(label, identifier, model_name)
Interactive Predict
A prediction usually needs the model name and features, and optionally an identifier.
client.predict(features, model_name, identifier)
The remainder of functions on the client are used internally and you should not need to call them directly. This library is under development and we will have more endpoints and functionality coming soon!