User Guide
Welcome to CiteLang! This is the first markdown syntax for citing software. Importantly, when you use CiteLang to reference software.
Generate basic software credit trees
Give credit accounting for dependencies!
No - we aren’t using DOIs! A manually crafted identifier that a human has to remember to generate, in addition to a publication or release, is too much work for people to reasonably do. As research software engineers we also want to move away from the traditional “be valued like an academic” model. We are getting software metadata and a reference to an identifier via a package manager. This means that when you publish your software, you should publish it to an appropriate package manager. Please let us know if you have a questions, find a bug, or want to request a feature! This is an open source project and we are eager for your contribution. 🎉️
Usage
Once you have citelang installed (Installation) you
can use citelang either from the command line, or from within Python.
Credentials
CiteLang will require a libraries.io token, so you should login (it works with GitHub and other easy OAuth2 that don’t require permissions beyond your email) and then go to the top right -> Settings -> API Key.
You’ll want to export this in the environment:
export CITELANG_LIBRARIES_KEY=xxxxxxxxxxxxxxxxxxxxxxxxx
If you use the GitHub package type, it’s recommended to export a GitHub token too.
export GITHUB_TOKEN=xxxxxxxxxxxxxxxxxxxxxxxxx
Commands
The following commands are available.
Package Managers
Let’s find package managers supported.
$ citelang list
This gives us the listing of package managers that we can interact with. Since by default we create a cache of results (to not use our token ratelimit whenever possible) after calling this endpoint you’ll find packages cached in your citelang home!
$ tree ~/.citelang/
/home/vanessa/.citelang/
├── cache
│   └── package_managers.json
└── settings.yml
This means if you make the call again, it will load data from here instead of making an API call. Note that there are actually two caches - the filesystem and memory cache. These are discussed in the config section. You can disable using or setting the cache for any command as follows:
$ citeling list --no-cache
Package
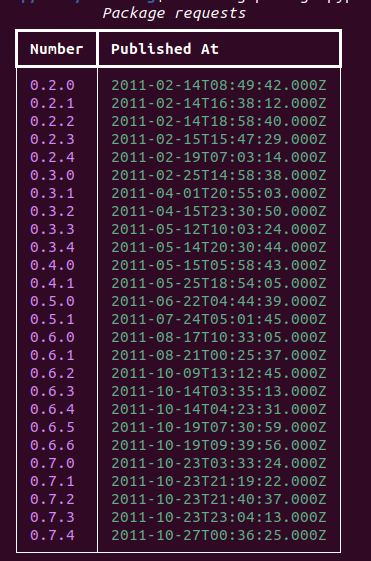
To get metadata for a package, or from the command line, to list versions available:
$ citelang package pypi requests
image:: https://raw.githubusercontent.com/vsoch/citelang/main/docs/getting_started/img/package-requests.png
Dependencies
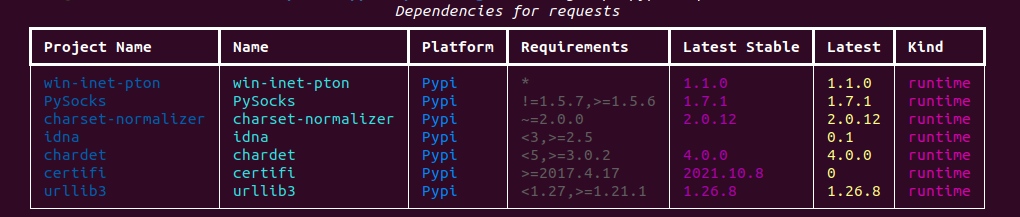
You can ask to see package dependencies:
$ citelang deps pypi requests
If you don’t provide a version, the latest will be used (retrieved from the package).
$ citelang deps pypi requests@2.27.1
image:: https://raw.githubusercontent.com/vsoch/citelang/main/docs/getting_started/img/requests-deps.png
Config
You don’t technically need to do any custom configuration. However, if you want to make your own user-specific settings file:
$ citelang config inituser
You can also edit the default config in citelang/settings.yml
if you control the install. We will be adding a table of settings when we add official
documentation. For now, let’s talk about specific variables.
disable_cache
This defaults to false, meaning we aren’t disabling the cache. Not disabling the cache means we can cache different results in your citelang home. We do this to minimize API calls. The exception is for when you ask for a package without a version. Since we cannot be sure what the latest version is, we need to check again.
disable_memory_cache
Akin to the filesystem, given that you are using a client in a session (whether directly in Python or via a command provided by citelang) we will cache results in memory. E.g., if you are asking for multiple packages, we check first that you are asking for a valid manager. When we cache the list of managers available, this is possible without an extra API call.
Cache
Citelng includes a cache command group for viewing or clearing your filesystem cache.
$ citelang cache
/home/vanessa/.citelang/cache
Or list what’s in it!
$ tree $(citelang cache)
And finally, clear it. You’ll get a confirmation prompt first.
$ citelang cache --clear
Are you sure you want to clear the cache? yes
Credit
To create a simple citation credit calculation, you can do:
$ citelang credit pypi requests
By default, we will split the credit graph until:
if set, we reach a threshold N of packages added (–max-depth)
if set, we reach a total number of unique dependencies added (–max-deps)
we reach a threshold that is smaller than our minimum credit (–min-credit)
It’s up to you to set the first two cases (they default to None, meaning unset) and we always only go up to a minimum threshold (or when there are no more dependencies to allocate). Note that first time you do it, you’ll see the endpoints being hit (they aren’t cached yet):
$ citelang credit pypi requests
GET https://libraries.io/api/platforms
GET https://libraries.io/api/pypi/requests
GET https://libraries.io/api/pypi/requests/2.27.1/dependencies
GET https://libraries.io/api/pypi/win-inet-pton
GET https://libraries.io/api/pypi/win-inet-pton/1.1.0/dependencies
GET https://libraries.io/api/pypi/PySocks
GET https://libraries.io/api/pypi/PySocks/1.7.1/dependencies
GET https://libraries.io/api/pypi/charset-normalizer
GET https://libraries.io/api/pypi/charset-normalizer/2.0.12/dependencies
GET https://libraries.io/api/pypi/idna
GET https://libraries.io/api/pypi/idna/0.1/dependencies
GET https://libraries.io/api/pypi/chardet
GET https://libraries.io/api/pypi/chardet/4.0.0/dependencies
GET https://libraries.io/api/pypi/certifi
GET https://libraries.io/api/pypi/certifi/2015.4.28/dependencies
GET https://libraries.io/api/pypi/urllib3
GET https://libraries.io/api/pypi/urllib3/1.26.8/dependencies
And then you’ll get the credit score:
$ citelang credit pypi requests
              requests: 0.5
           win-inet-pton: 0.071
                 PySocks: 0.071
      charset-normalizer: 0.036
                unicodedata2: 0.036
                    idna: 0.071
                 chardet: 0.071
                 certifi: 0.071
                 urllib3: 0.071
total: 1.0
The default “minimum credit” (to determine when we stop parsing) is 0.01. You can also try changing this value!
$ citelang credit pypi requests --min-credit 0.005
              requests: 0.5
           win-inet-pton: 0.071
                 PySocks: 0.071
      charset-normalizer: 0.036
                unicodedata2: 0.036
                    idna: 0.071
                 chardet: 0.071
                 certifi: 0.071
                 urllib3: 0.036
                     PySocks: 0.005
                   ipaddress: 0.005
                     certifi: 0.005
                        idna: 0.005
                cryptography: 0.005
                   pyOpenSSL: 0.005
                    brotlipy: 0.005
total: 1.0
By default, the --max-depth and --map-deps are unset so we don’t stop parsing based on some
maximum depth or number of dependencies. You can try setting these values as well.
Graph
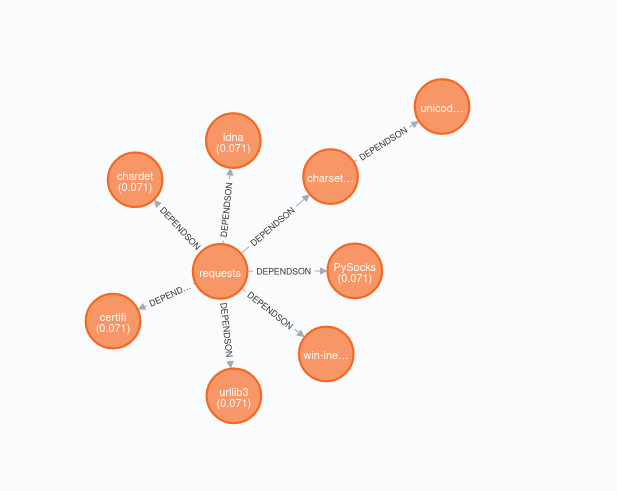
To create a simple citation graph, you can do:
$ citelang graph pypi requests
This will print a (much prettier) rendering of the graph to the console! Here is for pypi:
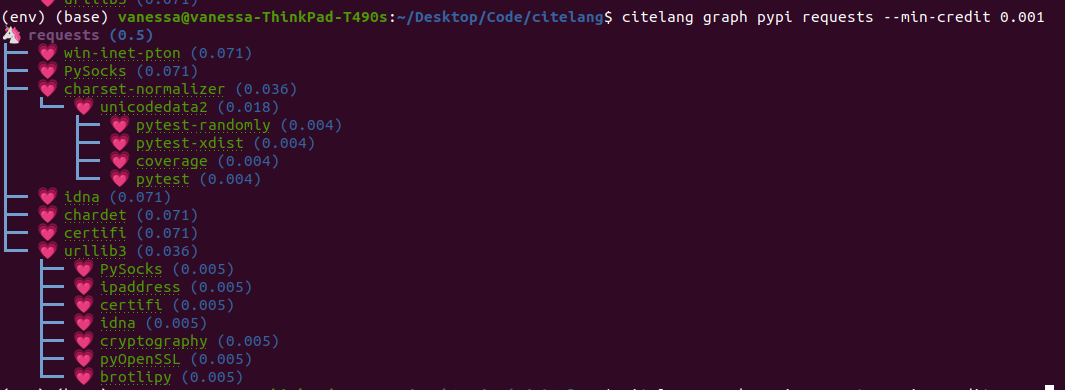
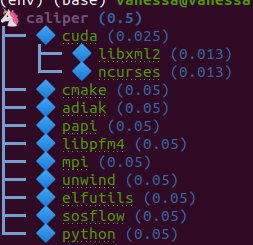
And citelang has custom package parsers, meaning we can add package managers that aren’t in libraries.io! Here is spack:
$ citelang graph spack caliper
And GitHub.
$ citelang graph github singularityhub/singularity-hpc

GitHub is a bit of a deviant parser because we use the dendency graph that GitHub has found in your repository. If you have a non-traditional way of defining deps (e.g., singularity-cli above writes them into a version.py that gets piped into setup.py) they won’t show up. Also note that when you cite GitHub, we are giving credit to ALL the software you use for your setup, including documentation and CI. Here is a more traditional GitHub repository that has a detectable file.
Dot
To generate (and then render a dot graph):
$ citelang graph pypi requests --fmt dot > examples/dot/graph.dot
$ dot -Tpng < examples/dot/graph.dot > examples/dot/graph.png
$ dot -Tsvg < examples/dot/graph.dot > examples/dot/graph.svg
Cypher
Cypher is the query format for Neo4j, the graph database.
$ citelang graph pypi requests --fmt cypher

CREATE (tlolycos:PACKAGE {name: 'requests (0.5)', label: 'tlolycos'}),
(jgaoitav:PACKAGE {name: 'win-inet-pton (0.071)', label: 'jgaoitav'}),
(jijibmow:PACKAGE {name: 'PySocks (0.071)', label: 'jijibmow'}),
(gotbtadg:PACKAGE {name: 'charset-normalizer (0.036)', label: 'gotbtadg'}),
(lflybqsc:PACKAGE {name: 'idna (0.071)', label: 'lflybqsc'}),
(kitlrsbz:PACKAGE {name: 'chardet (0.071)', label: 'kitlrsbz'}),
(gnveurko:PACKAGE {name: 'certifi (0.071)', label: 'gnveurko'}),
(eoikqvix:PACKAGE {name: 'urllib3 (0.071)', label: 'eoikqvix'}),
(kvccvkva:PACKAGE {name: 'unicodedata2 (0.036)', label: 'kvccvkva'}),
(tlolycos)-[:DEPENDSON]->(jgaoitav),
(tlolycos)-[:DEPENDSON]->(jijibmow),
(tlolycos)-[:DEPENDSON]->(gotbtadg),
(tlolycos)-[:DEPENDSON]->(lflybqsc),
(tlolycos)-[:DEPENDSON]->(kitlrsbz),
(tlolycos)-[:DEPENDSON]->(gnveurko),
(tlolycos)-[:DEPENDSON]->(eoikqvix),
(gotbtadg)-[:DEPENDSON]->(kvccvkva);
What you are seeing above is a definition of node and relationships. You can pipe to file:
$ citelang graph pypi requests --fmt cypher > examples/cypher/graph.cypher
If you test the output in the [Neo4J sandbox](https://sandbox.neo4j.com/) by first running the code to generate nodes and then doing:
MATCH (n) RETURN (n)
You should see:
From within Python you can do:
from citelang.main import Client
client = Client()
client.graph(manager="pypi", name="requests", fmt="cypher")
Gexf (NetworkX)
If you want to use networkX or Gephi or a viewer you can generate output as follows:
$ citelang graph pypi requests --fmt gexf
$ citelang graph pypi requests --fmt gexf > examples/gexf/graph.xml
To use the viewer, you’ll first need to import into Gephi so the nodes have added spatial information. Without this information, you won’t see them in the UI. You can then do the following:
$ here=$PWD
$ cd /tmp
$ git clone https://github.com/raphv/gexf-js
$ cd gexf-js
The file we generated above, we copy over the example so we don’t have to edit config.js
$ cp $here/examples/gexf/graph.xml miserables.gexf
And then run the server!
python -m http.server 9999
As an alternative, networkx can also read in the gexf file:
import matplotlib.pyplot as plt
import networkx as nx

graph = nx.read_gexf('examples/gexf/graph.xml')

nx.draw(graph, with_labels=True, font_weight='bold')
plt.show()
That should generate examples/gexf/graph.xml.
Badge
There are two kinds of badges:
static png for GitHub README.md or similar
interactive SVG for a web interface
Static
The static badge requires a few extra dependencies, namely plotly and supporting libraries. Either of these install methods will provide that:
$ pip install citelang[all]
$ pip install citelang[badge]
Static Sunburst
The default badge is a static sunburst, and it will generate a png file named by the package and manager. Both of these are the same:
$ citelang badge --template static pypi requests
$ citelang badge pypi requests
Here is an example of a shallow graph:
And a deeper one (setting --min-credit to 0.001.
Note that (as of version 0.0.2) you can also generate badges from requirements file:
$ citelang badge usrse.github.io Gemfile --outfile usrse-gem-deps.png
The above would generate a badge from the local Gemfile in the usrse.github.io repository, which is an arbitrary name we are assigning for the badge.
Interactive
An interactive badge is typically an svg in a webpage (meaning citelang will typically output an index.html file for you to include somewhere) for a user to interactively explore your dependency tree. We have a few different versions of badges that you can generate for your software!
Sunburst
To generate a sunburst interactive (html) badge:
$ citelang badge --template sunburst pypi requests
And this command will generate:
of course you can lower the credit threshold to see an expanded plot:
$ citelang badge pypi requests --min-credit 0.001
Or see an interactive version here.
Treemap
For the treemap we took inspiration from the periodic table of elements, meaning that the top layer looks like a single element, and clicking allows you to explore the nested inner tables, and each table is composed of squares.
$ citelang badge --template treemap pypi requests
or for more depth in your badge (and to save to a custom output file):
$ citelang badge pypi requests --min-credit 0.001 --outfile index.html
Saving to index.html...
Result saved to index.html
Here is the current example badge - you can click around to explore it!
Or see the interactive version here.
The badge design is still being developed - for example it would be good to have a smaller version, or a static one. If you have ideas or inspiration please open an issue!
Render
This command will support rendering an entire markdown file with software references, and create a citation summary table that can represent shared credit across your dependencies, weighted equally (by default) per package. As an example, let’s say we start with this markdown file . You’ll notice there are software references formatted as follows:
@apt{name=singularity-container, version=3.8.2}
@pypi{name=singularity-hpc}
@github{name=autamus/registry}
@github{name=spack/spack, release=0.17}.
And it ends in a References section, under which we’ve defined a start and ending tag (in html) for citelang.
<!--citelang start-->
<!--citelang end-->
Then to render the citation table into the file:
$ citelang render examples/pre-render.md
This will print the result to the screen! To save to output file (overwrite the same file or write to a different file):
$ citelang render examples/pre-render.md --outfile examples/post-render.md
You can see an example rendering here.
Gen (generate)
If you just want to generate a markdown file for a piece of software, you can do:
$ citelang gen pypi requests
And of course save to an output file:
$ citelang gen pypi requests --outfile examples/citelang.md
And akin to credit or graph, you can change the credit threshold to introduce more dependencies. You can see an example rendering here.
If you instead provide a name and filename to render, you can generate the same kind of rendering for a custom package (possibly not on pypi or other package managers):
$ citelang gen python-lib requirements.txt --outfile mylib.md
Here is a setup.py, harder to parse but we try!
$ citelang gen python-lib setup.py --outfile mylib.md
For each of the python file types, by default we use pip to parse (and get a more accurate result than static). However if there is some issue, it will fall back to the static parser. You can also disable using pipe entirely by doing:
export CITELANG_USE_PIP=false
As we move on to other languages, here is an example of parsing a Gemfile:
$ citelang gen ruby-lib Gemfile --outfile mylib.md
And a go.mod:
$ citelang gen go-lib go.mod --outfile mylib.md
or npm package.json:
$ citelang gen npm-lib package.json --outfile mylib.md
Cpp doesn’t have a great package manager, but we can still derive the direct dependencies from a CMakeLists.txt.
$ citelang gen cpp-lib CMakeLists.txt
Since a lot of C++ dependencies are in spack, we use that as the underlying manager! And here is an example with a DESCRIPTION file, which goes alongside an R package and includes dependencies.
$ citelang gen mylib DESCRIPTION --outfile mylib.md
Note that when using a custom generation for a requirements file, we cache dependencies but not the custom package, as that doesn’t easily fit in the cache namespace and can change. This function is also useful to use programatically from within Python, e.g., to parse a root and look for requirements files associated with it. Here is an example of parsing two requirements.txt files in a repository, and combining the results:
import citelang.utils as utils
import citelang.main.parser as parser
import os

# This is an example of using citelang to parse two repos,
# and to generate a software citation tree that combines BOTH
# Here we choose two projects with overlapping dependencies
repos = {}
for name in ["vsoch/django-river-ml", "vsoch/django-oci"]:
    repos[name] = utils.clone(name)

# You can use a find here, but here I know there are requirements.txt!
cli = parser.RequirementsParser()
for name, repo_dir in repos.items():
    require_text = os.path.join(repo_dir, "requirements.txt")
    cli.gen(name, filename=require_text)

# Summarize across packages!
table = cli.prepare_table()

print(table.render())
If you save your client data to file (e.g., to data.json for some repository) you can later load it into a parser to combine results.
# Let's say we have a list of data.json files, each with a repository and dependencies
roots = global_cli.load_datafiles(data_files)

# Let's tweak the round by value to our liking...
global_cli.round_by = 100

# And render providing the custom data!
global_cli.render(data=roots)

# You can also do the same, but scope to a type of requirement file
data = global_cli.load_datafiles(data_files, includes=["setup.py", "requirements.txt", "pypi"])
data = global_cli.load_datafiles(data_files, includes=["cran", "DESCRIPTION"])
data = global_cli.load_datafiles(data_files, includes=["package.json", "npm"])
data = global_cli.load_datafiles(data_files, includes=["go.mod", "go"])
And then you could run a custom render for each to generate the requirements table, but scoped to a language.
Contrib
Contrib will allow you to look at a different kind of credit - git commits!
It’s recommended to look for data between two git tags or commits:
$ citelang contrib --start 0.0.17 --end 0.0.19
The above assumes a .git repository in the present working directory. You can change that path:
$ citelang contrib --start 0.0.17 --end 0.0.19 --root /path/to/repo
By default, the results are printed to a table, and by author, and without detail. To add detail (e.g., specific files to authors, and authors to paths):
$ citelang contrib --start 0.0.17 --end 0.0.19 --detail
To change the “by” field:
$ citelang contrib --start 0.0.17 --end 0.0.19 --by author
$ citelang contrib --start 0.0.17 --end 0.0.19 --by path
or to instead save to an output file (complete json)
$ citelang contrib --start 0.0.17 --end 0.0.19 --outfile author-lines.json
Note that by default, we do a deep search, meaning that we do not include --first-parent
when we derive a list of commits (adds more commits) and we do not add -C or -M to
the blame command to try and squash copies and movements. However, if you want a more
shallow result that does this:
$ citelang contrib --start v3.9.1 --end v3.9.2 --filters filters.yaml --detail --shallow
All of these examples currently print a table and save data. We have plans to provide an associated action that can use this data and generate a contributors panel for each release (or some other range based on commits or tags).
It may be that you want to disambiguate different aliases, or ignore contributions by bots or just particular files or authors (e.g., there was a single commit from “root” in a repository I was parsing, and I can’t do much with that). To support this, we allow an optional filters file, which might look like the following:
authors:
  Vanessa Sochat: vsoch
  Cedric Clerget: Cédric Clerget
  cclerget: Cédric Clerget
  ArangoGutierrez: Eduardo Arango
  Marcelo E. Magallon: Marcelo Magallon
  Ian: Ian Kaneshiro
  sashayakovtseva: Sasha Yakovtseva
  jscook2345: Justin Cook
  GodloveD: David Godlove
  Dave Trudgian: David Trudgian
  Gregory: Gregory M. Kurtzer
ignore_bots: true

# Ignore these files across the repository
ignore_basename:
  - go.mod
  - go.sum

# Ignore these specific files
ignore_files:
  - full/path/to/README.md

# Ignore these specific users
ignore_users:
  - root
The above first has a list of authors that we want to match to a particular alias. For example,
any mention of my full name should be associated to “vsoch.” The ignore_bots is a boolean
flag that will skip over a username with [bot], and finally, the list of ignore should
be used sparingly. You generally don’t want to ignore anyone unless it’s obviously a weird mistake
(e.g., someone commit as root, and I could never figure out who that was if I tried. But I could
probably guess :O) Then we can run the command with this file:
$ citelang contrib --start v3.9.7 --end v3.9.8 --all-time --filters singularity-filters.yaml
And then we get a much cleaner and organized table because authors are not represented twice. You could also get creative here and provide groups that are named based on an organization or group. For example:
authors:
  vsoch: Dinosaur
  Vanessa Sochat: Dinosaur
  Cédric Clerget: Superhero
  Cedric Clerget: Superhero
  cclerget: Superhero
  ArangoGutierrez: Avocado
ignore_bots: true
ignore:
  - root
It’s up to you how you want to use that functionality! If you need further filter functionality, please let us know.
Since we want find-grained contributions, we count lines with git blame, so this method will be a little bit slower than other means to assess credit, because when we run git blame on a file we get the last commit and timestamp that every line was modified. This gives us the ability to have two modes - being able to see contributions for all time, or limiting to a specific range. The way contrib works is to:
Take a start and end tag or commit to parse
Find the range of commits relevant to that range
For each commit, find all relevant changed files
Run git blame for the commit and file, and save a cached result
The result includes authors, paths, commits, timestamps, and counts (lines) per timestamp
Each multiprocessing worker returns the complete blame result
We combine results across workers
Unless the
--all-timeflag is provided, we then filter down to timestamps within the rangeWe organized based on author or path, and with or without detail
The result is printed or saved to the filesystem as json
For the fourth step, we run jobs with multiprocessing, and we store the result in the .contrib
cache, which is organized equivalently to the repository. For example, here is Singularity after a run, and we can
see there are files from both the golang history and the previous bash/C++ and python
history:
$ ls .contrib/cache/
alpinelinux  bin                 configure.ac     debian  examples  INSTALL.md  ...
AUTHORS      CHANGELOG.md        CONTRIBUTING.md  docs    go.mod    internal    ...
AUTHORS.md   cmd                 COPYING          e2e     go.sum    libexec     ...
autogen.sh   CODE_OF_CONDUCT.md  COPYRIGHT.md     etc     INSTALL   LICENSE     ...
This happened because I ran contrib for an older version range and a newer version range. If we look in any particular file “directory” we find json files named by commit that had blame run. We can look in each json file and see the blame:
{
    "Vanessa Sochat": {
        "libexec/cli/inspect.exec": {
            "be6c7a85391e79e1273acc659410fbd17ced6d5f": {
                "1495390269": 28
            },
            "cf8bbc36e1a97be04e779c5d0ab2f9a4a407cfdb": {
                "1495597759": 5
            }
        }
    },
    "Gregory M. Kurtzer": {
        "libexec/cli/inspect.exec": {
            "3a9f9cf1e6369080c4676a8919e2cb09d8116e6e": {
                "1496258562": 2
            },
            "2ad9d5862b7d1cea937044a23997bf66cd06695c": {
                "1483468664": 2
            },
What we see above are authors, file paths, and commits, timestamps, and then changed lines for each timestamp. The reason we have different commits for one blame (run for a commit) is because this represents the git blame for every line of the file at that timepoint. This is also why we keep the timestamps, because we can then filter this set down to include only commits that were within a desired range. But it also gives us the ability to see “all time credit” at any particular timestamp, which is pretty cool!
Once you parse a blame for a specific commit and file, you won’t need to parse
it again as it will be cached in (default) .contrib in the present working
directory. We can load that file and filter it for different contexts.
GitHub Action
CiteLang has several GitHub actions to make it easy to automate using some of these tools, and proudly show your software credit trees.
Generate GitHub Action
If you want to generate a software credit markdown for your software (perhaps after a release) you can do the following. Here is an example of releasing a Python package.
name: Release Python Package

on:
  release:
    types: [created]

jobs:
  deploy:
    runs-on: ubuntu-20.04

    steps:
    - uses: actions/checkout@v2

    - name: Install
      run: conda create --quiet --name release-env twine

    - name: Install dependencies
      env:
        TWINE_USERNAME: ${{ secrets.PYPI_USER }}
        TWINE_PASSWORD: ${{ secrets.PYPI_PASS }}
      run: |
        export PATH="/usr/share/miniconda/bin:$PATH"
        source activate release-env
        pip install -e .
        pip install setuptools wheel twine
        python setup.py sdist bdist_wheel
        twine upload dist/*

    - name: Generate CiteLang
      uses: vsoch/citelang/action/gen@main
      env:
        CITELANG_LIBRARIES_KEY: ${{ secrets.CITELANG_LIBRARIES_KEY }}
      with:
        package: citelang
        manager: pypi
        outfile: software-credit.md
Notice that we have generated a libraries.io key to make the process faster. and customized the file to be named software-credit.md.
Badge GitHub Action
Here is how you would generate a png badge for your repository, named custom or by the <manager>-<package>.png (default).
- name: Generate CiteLang Badge
  uses: vsoch/citelang/action/badge@main
  env:
    CITELANG_LIBRARIES_KEY: ${{ secrets.CITELANG_LIBRARIES_KEY }}
  with:
    package: citelang
    manager: pypi
    outfile: pypi-citelang.png
Adding an additional step to commit a file and push to main might look like:
- name: View generated file
  run: cat software-credit.md

- name: Push Software Credit
  run: |
    git config --global user.name "github-actions"
    git config --global user.email "github-actions@users.noreply.github.com"
    git add software-credit.md
    git commit -m "Automated push with new software-credit $(date '+%Y-%m-%d')" || exit 0
    git push origin main || exit 0
You could also open a pull request if you want to review first!
Contribute GitHub Action
This is to generate contribution data, and you can decide what to do with it. It could be for provenance or analysis.
- name: Generate CiteLang Contrib Data
  uses: vsoch/citelang/action/contrib@main
  with:
    root: /tmp/cloned-repo
    outdir: /tmp/cloned-repo/.contrib
    start: 0.0.52
    end: 0.0.53
    detail: true
If you would like another tool developed, or to discuss an idea for software credit, please don’t hesitate to reach out to @vsoch.
Python
You can do all of the same interactions from within Python! And indeed if you want to do some kind of analysis or custom parsing this is the recommended approach. For all cases from within Python, after exporing the token, we need to create a client.
from citelang.main import Client
client = Client()
You can optionally provide a custom settings file:
os.environ['CITELANG_SETTINGS_FILE'] = "settings.yml"
client = Client()
Now let’s get our list of package managers:
result = client.package_managers()
The raw data will be here on the results object:
result.data
And this is how we print to the terminal
result.table()
Let’s say you ran this, and you wanted to retrieve it again! Given that disable_cache in your settings
is not set to True, you can call the function again and the data returned will be from the cache.
You can also ask for it verbatim:
client.package_managers()
or
client.get_cache('package_managers')

{'name': 'Inqlude',
 'project_count': 228,
 'homepage': 'https://inqlude.org/',
 'color': '#f34b7d',
 'default_language': 'C++'}]
To get metadata for a package:
client.package(manager="pypi", name="requests")
Or to ask for dependencies:
client.dependencies(manager="pypi", name="requests")
Without a version, we will grab the latest. Otherwise we use the version provided.
Frequently Asked Questions
Why don’t the trees print versions?
The current thinking is that when I give credit to software, I’m not caring so much about the version. The goal of this isn’t reproducibility, but rather to say “for this software package, here are the dependencies and credits to give for each.” Given a version (which will default to latest) this will mean a particular set of dependencies, but it’s not something we require reproducing, especially because we choose a threshold (number of dependencies, a credit minimum threshold, or depth) to cut our search. The only data we care about is preserving a representation of how to give credit after we do a search.
Why don’t the trees show package managers?
In truth we probably should, because looking at a credit graph later you need to know the manager used to derive the graph (e.g., some packages can be present in multiple package managers!) I haven’t added this yet.
This library is under development and we will have more documentation coming soon!