I’ve recently wandered into a domain of studying computers that I barely knew existed, and it is complex and lovely and strangely intuitive. That domain is Operating Systems, and I feel a compulsion to understand what is going on, and then to use this understanding in to build my own things. I don’t think I fully understand the extent of this statement, but I want to have a go at creating an operating system. This isn’t something that can be done in Python, and my goal is to document my journey in this repository. The end goal will be a tutorial of sorts for understanding and designing the most simplest one I can come up with, and then we can have fun and try things based on our new understanding.
The Boot Loader
Let’s start with step 1, and go over some basics. Have you ever partitioned a drive on your computer, and seen this tiny section called a Boot Sector? Did you hopefully not delete it? Today I want to talk about all things Booty. The Boot Loader is the executable that will load your operating system when your computer boots up. The Boot Sector is a specific region of disk where this instruction lives. A cool thing I realized is that there isn’t any significant difference between a “data” type disk and one with an operating system installed, other than stumbling on this particular sector. We will discuss this further.
1. Create Boot Sector
The file in the boot folder is an assembly language file (extension *.asm), meaning that it can be converted to machine language using an assembler like nasm. This is how we are going to write the script that gets executed on boot.
In our container, what we basically do is copy the asm file to /boot, convert to machine code with nasm (installed
in the container) and then run it with an emulator called qemu
which is an open source virtualization software.
nasm -f bin /boot/boot_sect_simple.asm -o /boot/boot_sect_simple.bin
The -f bin option tells the program to make raw machine code. If we don’t add this I think it makes some kind
of package with metadata. We might need this metadata for a more proper boot binary / package, but not for now!
Then this is how I ran it the first time, meaning “booting” up with my binary boot loader and the emulator:
# Be careful running this, it's an infinite loop :)
alias qemu='qemu-system-x86_64'
qemu /boot/boot_sect_simple.bin -curses
Omg it worked! The output looked like this:
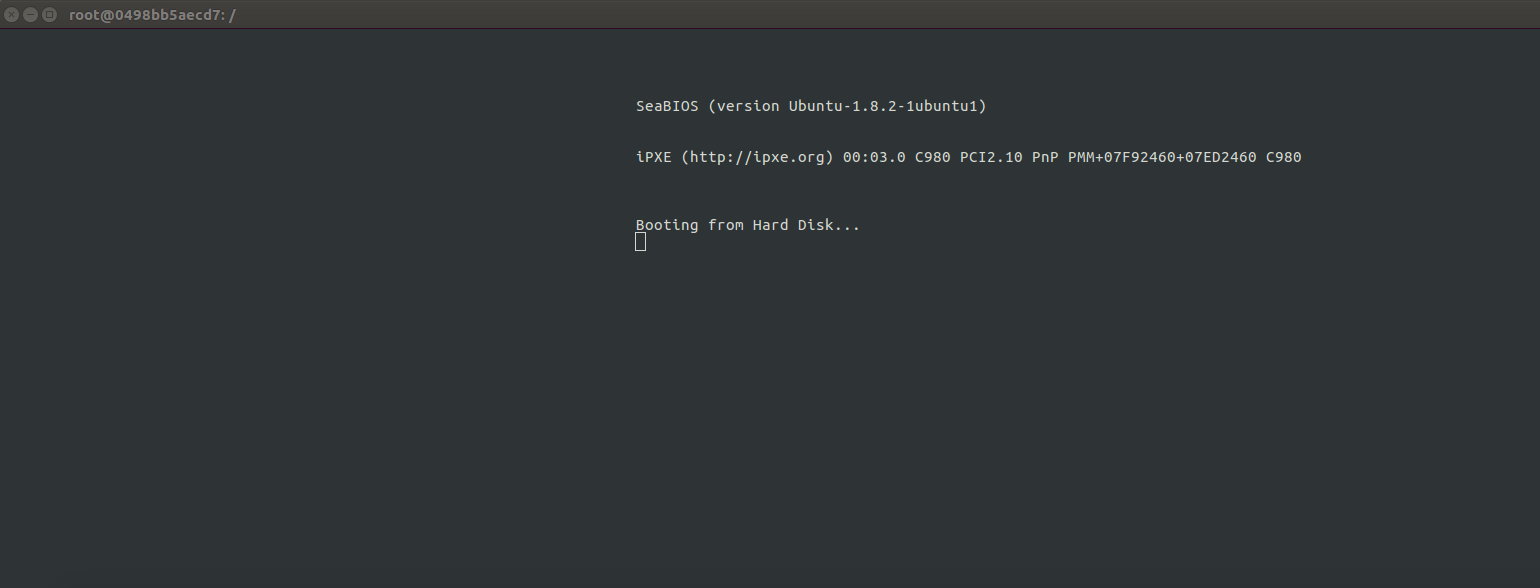
Note that I use the -curses flag because when I didn’t, the virtualization didn’t work in the container.
root@bcb91febe714:/#  qemu /rootfs/boot/boot_sect_simple.bin
WARNING: Image format was not specified for '/boot/boot_sect_simple.bin' and probing guessed raw.
         Automatically detecting the format is dangerous for raw images, write operations on block 0 will be restricted.
         Specify the 'raw' format explicitly to remove the restrictions.
warning: TCG doesn't support requested feature: CPUID.01H:ECX.vmx [bit 5]
Could not initialize SDL(No available video device) - exiting
And how could I actually capture this? I wrote a small script to run after an asciinema to do this. Note that I had to open another terminal and kill the process in order to finish the recording.
#!/bin/bash

# This is a silly way to capture the output (to the terminal using the qemu
# emulator) into an asciinema. We start the ascinema, echo some lines, then
# run the emulator. In another window I use "top" to find the process and then
# kill to stop the emulator. Then I can finish up and exit from the asciinema

# Start the asciinema recording
# nasm -f bin boot_sect_simple.asm -o boot_sect_simple.bin
# asciinema rec booty.json
# /bin/bash record_boot.sh

echo "Here we are going to show a quick demo of the bootloader."
sleep 3

echo "The asciinema might cut when it loops continually, and I'm going to try to run it in a subprocess."
sleep 3

echo "It might take me a few seconds to open another terminal and then kill qemu"
sleep 3

# Make an alias for qema, run in subprocess?
(qemu-system-x86_64 boot_sect_simple.bin -curses)
sleep 3
echo "Are we still here? That's it!"
exit
# asciinema upload booty.json
Here is the result!
Add Text to Boot
I don’t know assembly, so I was reading this article and playing around with different hex character to add to print messages! It turns out these lines do translate to human to some extent:
jmp # jump to the line start (hello infinite loop!)
times 510-($-$$) db 0 # fill in '0's from bytes at current position to 510th
dw 0xAA55 ; # Write a word (2 bytes) data 0xAA55 at current position.
            # I guess the 55 comes before the AA but I need to read up on assembly!
The general idea seems to be that for assembly, you literally have to tell the language to move a byte and then put a letter there. The different registries are called ax bx cx and dx and you can reference decimals or bytes. Here are the examples from the document linked above.
mov ax , 1234 ;   "store the decimal number 1234 in ax"
mov cx , 0 x234 ; "store the hex number 0 x234 in cx"
mov dx , ’t ’ ;   "store the ASCII code for letter ’t’ in dx"
mov bx , ax ;     "copy the value of ax into bx , so now bx == 1234"
And then if we want to say:
- put in teletype mode to advance the cursor
- print an ascii character
- interrupt to change (and then another character would follow)
We would do:
mov ah, 0x0e ; tty mode
mov al, 'H'
int 0x10
And then here is how I changed the file so it prints something quasi meaningful:
mov ah, 0x0e ; tty mode
mov al, 'H'
int 0x10
mov al, 'e'
int 0x10
mov al, 'l'
int 0x10
int 0x10
mov al, 'o'
int 0x10
mov al, ''
int 0x10
mov al, 'D'
int 0x10
mov al, 'i'
int 0x10
mov al, 'n'
int 0x10
mov al, 'o'
int 0x10
mov al, 's'
int 0x10
mov al, 'a'
int 0x10
mov al, 'u'
int 0x10
mov al, 'r'
int 0x10
mov al, '!'
int 0x10

jmp $ ; jump to current address = infinite loop

; padding and magic number
times 510 - ($-$$) db 0
dw 0xaa55
This is like, me talking directly to my computer! I find this nuts! (meaning cool).
How is this going to work?
I’m reading from the Boot Process chapter here, which describes the following flow.
1
The computer without an OS has a simple utility, the Basic Input/Output Software (BIOS) that you likely know about if you’ve ever done any kind of debugging or testing of your hardware. It’s a set of routines that are called when the computer starts, and is mostly about control for disks, screen, memory, and keyboard devices. If all goes well, the operating system is booted from a device.
2
Since there is no way for the software to know where to look, there is a stupid rule that it knows to always look in certain addresses (physical locations) of the disk devices. And tada! We call this the Boot Sector (I’ve heard of this before!) and it’s located at “Cylinder 0, Head 0, Sector 0)” If you’ve ever reformatted your hard drive you would have seen this little section and probably scratched your head. Good job for not deleting it :) It’s identified correctly by ending in a “magic number” 0xaa55.
I loaded the file into a graphical hex editor on my local machine to look at the hex from the compiled binary!
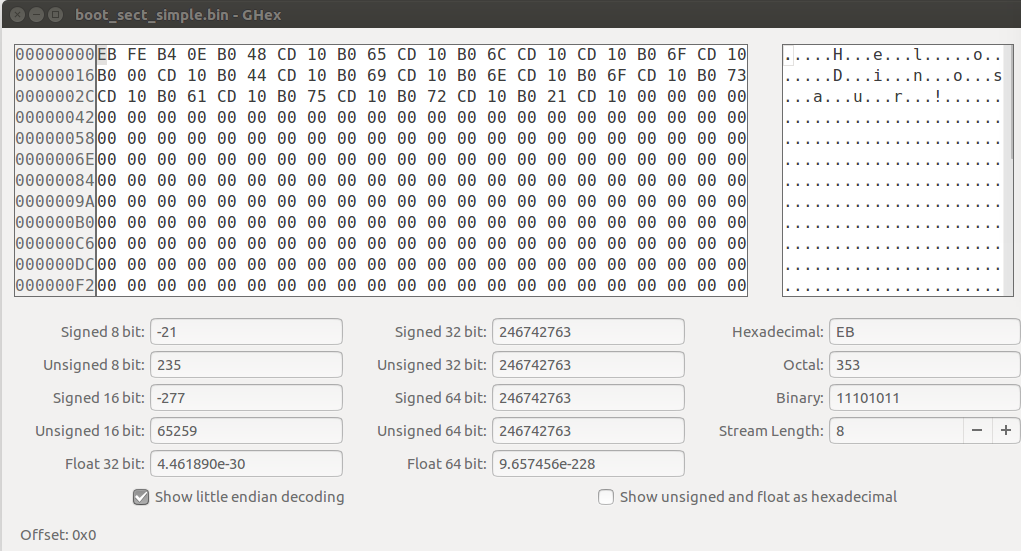
Actually, there is a command line tool to do the same:
# man od --> dump files in octal and other formats
od -t x1 -A n boot_sect_simple.bin
 eb fe b4 0e b0 48 cd 10 b0 65 cd 10 b0 6c cd 10
 cd 10 b0 6f cd 10 b0 00 cd 10 b0 44 cd 10 b0 69
 cd 10 b0 6e cd 10 b0 6f cd 10 b0 73 cd 10 b0 61
 cd 10 b0 75 cd 10 b0 72 cd 10 b0 21 cd 10 00 00
 00 00 00 00 00 00 00 00 00 00 00 00 00 00 00 00
*
 00 00 00 00 00 00 00 00 00 00 00 00 00 00 55 aa
You can even try this for the boot loader executables on your host!
$ od -t x1 -A n /boot/memtest86+.bin
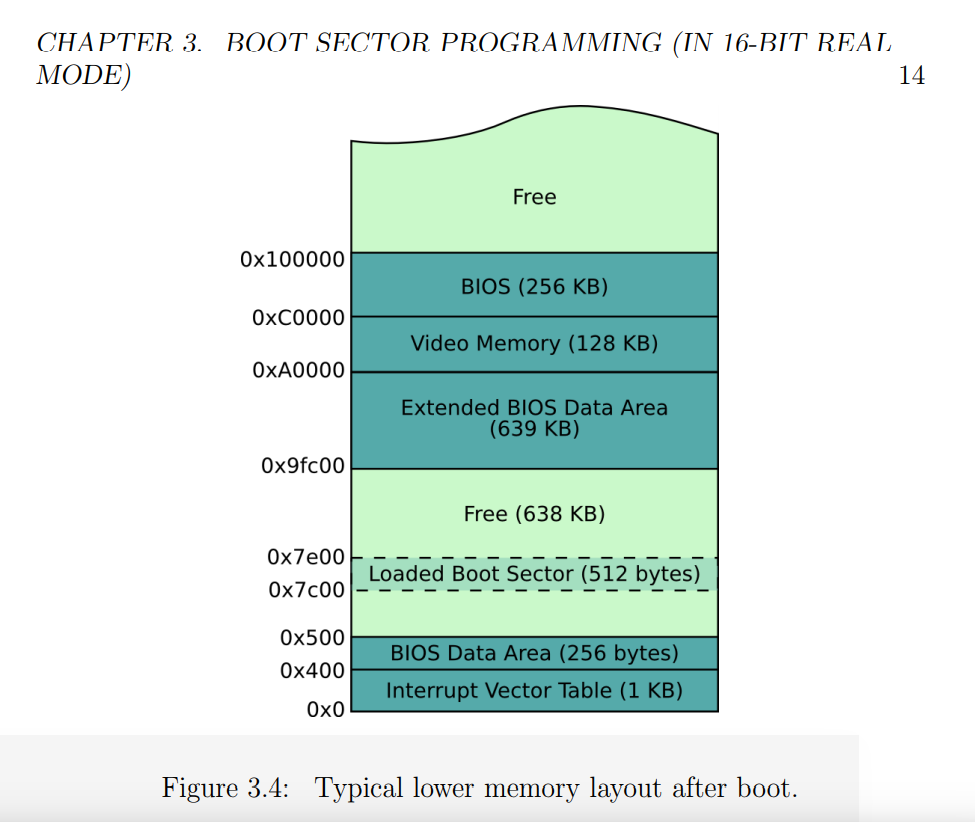
Then what happens when we load it? Also from the chapter on page 14, we can see how “lower memory” is mapped out when the computer starts up. The BIOS has loaded it at 0x7C00 (remember that 0x indicates it’s a hexidecaimal address, and since we have 16 characters we go from 123…def)
I’ll finish up this Boot Sector section with a cool tidbit of information. This is really interesting - the oldest CPU in Intel’s family is called the Intel 8086, and it’s so old that it only supported 16 bit instructions and no memory protection, meaning that a user could interact with the kernel’s memory directly. All modern Intel emulators start in this mode so that they can continue happily in it, or switch to a more advanced mode (I don’t totally understand this switch yet so I won’t talk about it).
Who Cares?
Why do I think this is important? Other than being fun, whether you are a software engineer or a scientist, it’s common to have tunnel vision when it comes to your frame of reference and tooling base. Your entire flow of thinking starts with some programming language on an operating system, and maybe you get into an argument with your colleague about which sub-technology in a space is slightly superior. While I’m not saying that many might benefit from starting at a level below that, it’s worth minimally knowing that the level exists. For some, it could be the case that a hard problem you are working on might be better approached by operating (harhar) at a different level. For me, asking these simpler questions that reveal the complexity and beauty in the design of a computer, and the infinite ways that might be used, brings pure amazement. Problems and bugs that I encounter every day take on a new light, and I can only imagine the future fun I might have making new things! This also gives me great appreciation for the decades of work that has led to this complexity. I know that everyone is obsessed with GPUs and AI right now, but I find this domain to be a much better snack for my dinosaur hunger. Rawr!
Suggested Citation:
Sochat, Vanessa. "Learning About Operating Systems: Part 1." @vsoch (blog), 30 Apr 2018, https://vsoch.github.io/2018/os-bootloader/ (accessed 14 Jul 26).