1. SLURM Job Manager, smanage
Slurm Manage, for submitting and reporting on job arrays run on slurm
Practices for Reproducible Research
Let’s set up our story. You are a graduate student, a postdoc, or staff in lab, and you want to use Sherlock, Farmshare, or one of the other Stanford clusters to run an interactive notebook. This might mean Jupyter notebook, or even a notebook with Julia, or R. This tutorial will help teach you how to do that.
Today we are going to do the following:
Watch the above in action in the video below, and keep reading to try it out!
The purpose of the containershare is so that @vsoch can easily provide version controlled, pre-built containers that are ready to go for you! In fact, the containershare is not only a table on the web, it’s (on Stanford servers) an actual folder of the shared containers (hence the container share!) that is looked at before other avenues.
How does it work?
The containers in that table are provided on the Stanford clusters defined for the tool under @vsoch scratch, named by their hash. Here is a peek:
$ ls /scratch/users/vsochat/share -1
-
010188b95ce3e1b29e133901729f88b5.simg
053d59c24daa2aa73ad3512a007dd408.simg
0b44a706bda7a87b89013ad1e2760190.simg
11a772667fd0712bdf17d8cb52f89cd4.simg
12591da722912b13dfd32da0afe3b1ae.simg
...
When you ask for a container, we use the name of the hash to find the file in the containershare! This way, if you are using a container provided in the table in the web interface (or custom built for you by @vsoch) you don’t need to pull or download or build anything. This is helpful because in some cases, the pull doesn’t work as expected on Sherlock.
$ CONTAINER=docker://vanessa/repo2docker-julia:9ea83b39fd
$ CONTAINER_NAME=$(echo -n "${CONTAINER}" | md5sum | awk '{ print $1 }').simg
$ echo $CONTAINER_NAME
c92c3c3f3f9045bcd460466c952c1484.simg
In the above, the container on Docker Hub called vanessa/repo2docker-julia with tag 9ea83b39fd is named c92c3c3f3f9045bcd460466c952c1484.simg on the cluster containershare. We’ll see how this is found later in this tutorial.
How do we find the container we want?
For this example today, we are going to be using the container in the table called repo2docker-julia. It’s linked from the containershare table and has its own table here. If you wanted to learn about the guts of the container:
See the the container’s Github repository if you want to learn about specific usage and instructions for the container, or this post on the containershare if you want more detail on how the container is built, and the metadata and interface generated.
How do we reference the container we want?
We want to grab the “unique resource identifier” (called the “uri”) of the container, which is docker://vanessa/repo2docker-julia:9ea83b39fd. This is in reference to an
image on Docker Hub that has a particular tag, and the tag also corresponds to a Github commit.
What’s wrong with “latest”?
The tag “latest” is easy to remember, but in that it always corresponds to the latest build, the “latest” that you get today may not be the same container that is tagged with “latest” tomorrow. For the sake of reproducibility, do not use “latest.”
The chosen one!
Let’s choose vanessa/repo2docker-julia:9ea83b39fd. This is a vanilla jupyter+julia container that you could use as a template for your
own Jupyter+julia notebook! Want to skip Sherlock all together? You can do this too :) Here is how to run the container with
Docker, on your local machine:
docker run --rm -it -p 8888:8888 vanessa/repo2docker-julia jupyter notebook --ip 0.0.0.0
Honestly? If I am using a notebook, this is my preference. The harsh reality is that setting up ssh forwarding, on an interactive node that you have to wait for, with a large number of dependencies with respect to libraries that are needed, is really hard. We can only do our best to provide tools that abstract this away. But I understand that this is needed, and so until we have a different kind of cluster that makes this easy, I (and your research computing team) are here to help you, to the best that we can. Let’s continue!
Next, we need the forward tool to run our container! Clone the repository, and remember the location. You will generate a parameters flie params.sh that you can go back to and use again.
git clone https://github.com/vsoch/forward
cd forward
Take a look at the files we have to work with (I’ve removed documentation markdown ones):
$ tree -L 1
.
├── end.sh     (-- end a session
├── resume.sh  (-- resume a started session
├── sbatches   (-- batch scripts you can run to forward a port to, organized by cluster
├── helpers.sh (-- just helper functions
├── hosts      (-- generate configurations for your ~/.ssh/config
├── setup.sh       (-- run once to set up the tool
├── start-node.sh  (-- start a node (but without ssh forwarding / interactive notebook )
└── start.sh       (-- how you start a connection
For Jupyter, since we want an interactive session, we are first going to generate a file called params.sh
that is specific to a cluster we are using (e.g., sherlock). We are then going to use start.sh with the uri of the
container we found above and a batch script for slurm in the sbatches/sherlock folder to launch our notebook.
Let’s do that.
Run the setup.sh file to generate your parameters, which will ask you questions about the cluster
configuration that you want.
partition
If you are on Sherlock and want your libraries to have access to a gpu, then make sure to select “gpu” for a partition. Otherwise, your PI’s parition or the default of “normal” is ok. In the example below, I choose the “russpold” partition that corresponds to my lab in graduate school, just as an example.
resource
This is the resource identifier. Notice that I’m just pushing enter through the first prompt to get the default “sherlock.”
containershare
This is a new addition added to the forward tool. If you have a containershare
installed on your cluster,
meaning a folder of shared containers (either by you or a cluster administrator)
you can use a containershare-notebook.sbatch (or similar) script to
get direct access to these containers. If you don’t care about containershare, just press enter through
this setting.
We are going to do that in the tutorial today, and will show more detail. The CONTAINERSHARE variable basically
refers to this table! If you are on Sherlock at Stanford,
leave it to the default (/scratch/users/vsochat/share) and you’ll get the containers
in the table. You can also
create your own, whether that means
downloading an existing one, or deploying a new interface and containers. But let’s
not get sidetracked!
$ bash setup.sh

First, choose the resource identifier that specifies your cluster resoure. We
will set up this name in your ssh configuration, and use it to reference the resource (sherlock).

Resource identifier (default: sherlock) >

sherlock username > vsochat

Next, pick a port to use.  If someone else is port forwarding using that
port already, this script will not work.  If you pick a random number in the
range 49152-65335, you should be good.

Port to use > 56845

Next, pick the sherlock partition on which you will be running your
notebooks.  If your PI has purchased dedicated hardware on sherlock, you can use
that partition.  Otherwise, leave blank to use the default partition (normal).

sherlock partition (default: normal) > russpold

A containershare (https://vsoch.github.io/containershare is a library of
containers that are prebuilt for you, and provided on your cluster resource. if you
are at Stanford, leave this to be the default. If not, ask your HPC administrator
about setting one up, and direct them to https://www.github.com/vsoch/containershare.

container shared folder (default for Stanford: /scratch/users/vsochat/share) >
That’s it! The above produced the following details in “params.sh”
$ cat params.sh
USERNAME="vsochat"
PORT="56845"
PARTITION="russpold"
RESOURCE="sherlock"
MEM="20G"
TIME="8:00:00"
CONTAINERSHARE="/scratch/users/vsochat/share"
This is just a text file with variables that you are free to tweak.
SSH credentials are defined in the file ~/.ssh/config, and will make it easy to connect to the cluster(s) of
your choosing. You can look at this file on your computer (if it exists) to see what is set up already.
Since I regularly use farmshare and sherlock, I have them defined:
$ cat ~/.ssh/config

Host sherlock
    User vsochat
    Hostname sh-ln06.stanford.edu
    GSSAPIDelegateCredentials yes
    GSSAPIAuthentication yes
    ControlMaster auto
    ControlPersist yes
    ControlPath ~/.ssh/%l%r@%h:%p

Host farmshare
    User vsochat
    Hostname rice.stanford.edu
    GSSAPIDelegateCredentials yes
    GSSAPIAuthentication yes
    ControlMaster auto
    ControlPersist yes
    ControlPath ~/.ssh/%l%r@%h:%p
If you don’t have the file, or want to update your configuration, the forward tools provides
a set of scripts that will again prompt you for your username, and then spit out a configuration.
Take a look in the hosts folder:
ls hosts/
  sherlock_ssh.sh
  farmshare_ssh.sh
You can run either of these scripts to print a configuration to your screen, and the configuration you can
then add to your ~/.ssh/config.
$ bash hosts/sherlock_ssh.sh

Sherlock username > tacocat
Host sherlock
    User tacocat
    Hostname sh-ln03.stanford.edu
    GSSAPIDelegateCredentials yes
    GSSAPIAuthentication yes
    ControlMaster auto
    ControlPersist yes
    ControlPath ~/.ssh/%l%r@%h:%p
This comes down to opening the file in a text editor, and then copy pasting, and you are allowed to have more than one configuration in the file, as I do above. Once they are set, you can shell into either cluster very easily with commands like:
ssh sherlock
ssh farmshare
The first time will prompt you for credentials, but subsequent sessions will not (see how ControlPersist is set to yes?). If
you don’t have a file, period, then you can generate the entire thing programatically like this:
bash hosts/sherlock_ssh.sh >> ~/.ssh/config
That’s it! We are now ready to grab and use our container from containershare to launch a notebook! As a reminder, in the tutorial below, we are going to walk through using Jupyter notebook with Julia.
The basic command format looks like this:
bash start.sh <sbatch> <container>
Let’s break it down, like a bad disco dance.
The <sbatch> in the example above refers to an sbatch script in our “sbatches” folder, let’s take a look at what we have (at the writing of
this tutorial).
$ tree sbatches/
sbatches/
├── farmshare                       (-- scripts intended for "farmshare"
│   ├── singularity-exec.sbatch
│   ├── singularity-jupyter.sbatch
│   └── singularity-run.sbatch
├── sherlock                           (-- scripts intended for sherlock
│   ├── containershare-notebook.sbatch (-- the same as singularity-notebook, but checks containershare folder first
│   ├── jupyter.sbatch
│   ├── py2-jupyter.sbatch
│   ├── py2-tensorflow.sbatch
│   ├── py3-jupyter.sbatch
│   ├── py3-tensorflow.sbatch
│   ├── singularity-exec.sbatch
│   ├── singularity-jupyter.sbatch
│   ├── singularity-notebook.sbatch
│   ├── singularity-run.sbatch
│   └── tensorboard.sbatch
├── singularity-exec.sbatch    (-- scripts that work across clusters
└── singularity-run.sbatch
Woweee, many more than with the original release of the tool! Since we are interested in Sherlock, and we are going to use a containershare container, we are going to use this one:
│ ├── containershare-notebook.sbatch
It’s actually the same as singularity-notebook but does a check first in our cluster shared folder for
the image binary. If it’s already downloaded (because @vsoch has provided it for you!) we don’t need to wait
for a pull. If you want to use a general notebook (that isn’t in the containershare) but is accessible via
a docker uri (e.g., docker://<username>/<repository> then you would want to look at once of these scripts:
$ ls sbatches/sherlock/sing* -1
  sbatches/sherlock/singularity-exec.sbatch
  sbatches/sherlock/singularity-jupyter.sbatch
  sbatches/sherlock/singularity-notebook.sbatch
  sbatches/sherlock/singularity-run.sbatch
These are the names that we need 1. In fact, the names above without the extension of sbatch is how we are going to call the command! The script we want is going to work for a containershare notebook sbatches/sherlock/containershare-notebook.sbatch and we refer to it like this:
bash start.sh sherlock/containershare-notebook <container>
By the way, if you ever want to look at the script, usage, or other, just look at the script you are about to run! You should do this anyway :)
cat sbatches/sherlock/containershare-notebook.sbatch | less
The “less” ensures that you can start at the top of the file, and press ENTER to move down it. If you are using vim, you can type q to quit.
We are almost there! Let’s just plug in our container now. The final detail is that since this command is expecting a Singularity container (it could reference a full path to a Singularity container on your scratch, for example) we need to tell the software that
it’s a Docker container, and use a docker uri (docker://)
$ bash start.sh sherlock/singularity-notebook docker://vanessa/repo2docker-julia:9ea83b39fd
Let’s walk through the output you see on the screen after issuing the command.
At this point you’ve used setup.sh to create params.sh and you are launching the container
to create an interactive notebook on the Sherlock cluster. Let’s walk you through the commands
that are printed to the screen, because they are added intentionally to help you.
The first thing that happens is finding the script that you want, on your local machine!
Since there are several different levels for a script 2
the first few lines tell you the script being looked for, and when a match is found,
you are told via the line that starts with Script:
$ bash start.sh sherlock/containershare-notebook docker://vanessa/repo2docker-julia:9ea83b39fd
== Finding Script ==
Looking for sbatches/sherlock/sherlock/containershare-notebook.sbatch
Looking for sbatches/sherlock/containershare-notebook.sbatch
Script      sbatches/sherlock/containershare-notebook.sbatch
The script sbatches/sherlock/containershare-notebook.sbatch will be used.
Next, we would want to check for an already existing notebook. If one is found, it would tell you to end it first.
== Checking for previous notebook ==
No existing sherlock/containershare-notebook jobs found, continuing...
The destination directory is a folder in your $HOME called forward-util where
the sbatch script will be transferred. It needs to be on the cluster before it can
be launched for use.
== Getting destination directory ==

== Uploading sbatch script ==
containershare-notebook.sbatch                                                                                                100% 2907     2.8KB/s   00:00
If you hadn’t authenticated yet, it would happen during the above step.
Next (and this is very important for your learning, or future you that is submitting jobs on the cluster) the tool shows you the command that it uses to submit your script:
== Submitting sbatch ==
sbatch --job-name=sherlock/containershare-notebook --partition=russpold --output=/home/users/vsochat/forward-util/containershare-notebook.sbatch.out --error=/home/users/vsochat/forward-util/containershare-notebook.sbatch.err --mem=20G --time=8:00:00 /home/users/vsochat/forward-util/containershare-notebook.sbatch 56845 "docker://vanessa/repo2docker-julia:9ea83b39fd"
Submitted batch job 23366437
Understand the Command
This is so hugely useful for your learning. Let’s look closely at this command, and understand every piece of it.
sherlock/containershare-notebook) so it’s always linkable, and in fact, this is how we check to see if you have a notebook running already!PARITION variable in your params.shMEMORY variable in your params.shHH:MM:SS requested for the job. The default is 8 hours, shown in the command above.There are more details on SLURM’s documentation page if you are interested. The next part of the submission command is the script followed by arguments:
/home/users/vsochat/forward-util/containershare-notebook.sbatch 56845 "docker://vanessa/repo2docker-julia:9ea83b39fd"
This shows us the full path to the same sbatch file that was uploaded (now on the cluster!) and the inputs that we provided.
What’s that weird number in the middle? That’s your PORT, a variable fed into the script that is also defined in your params.sh.
Without being empowered to look at logs, you are pretty helpless if something goes wrong. This is why the tool next prints for you a command you can copy paste (in another terminal from your local machine) to look at logs. You could also log in to the cluster and view the files, but this might be faster:
== View logs in separate terminal ==
ssh sherlock cat /home/users/vsochat/forward-util/containershare-notebook.sbatch.out
ssh sherlock cat /home/users/vsochat/forward-util/containershare-notebook.sbatch.err
Depending on the load of the cluster and your partition, the allocation of the job to a node can be speedy, or take a long time. We use a method called exponential backoff to keep checking if the node has been allocated.
== Waiting for job to start, using exponential backoff ==
Attempt 0: not ready yet... retrying in 1..
Attempt 1: not ready yet... retrying in 2..
Attempt 2: not ready yet... retrying in 4..
Attempt 3: not ready yet... retrying in 8..
Attempt 4: not ready yet... retrying in 16..
Attempt 5: not ready yet... retrying in 32..
Attempt 6: resources allocated to sh-02-21!..
sh-02-21
sh-02-21
notebook running on sh-02-21
Woot! We got the node! After the node is allocated, the container is identified, and the tool tells you the steps it is taking
to find it. You’ll see that we start with a URI, the working directory for our notebook will be $SCRATCH,
and for a first attempt we are going to look for the container in the containershare, which is located
at /scratch/users/vsochat/share. The hash value is what we get when we do an md5sum of docker://vanessa/repo2docker-julia:9ea83b39fd.
== Connecting to notebook ==
Container is docker://vanessa/repo2docker-julia:9ea83b39fd
Notebook directory is /scratch/users/vsochat
Attempt 1: Looking for /scratch/users/vsochat/share/c92c3c3f3f9045bcd460466c952c1484.simg
What happens if we don’t find it in the containershare? Here is the order of operations for our search:
SINGULARITY_CACHE?If the identifier isn’t found with any of the above avenues, it is pulled to your SINGULARITY_CACHEDIR. if the pull fails and we still don’t have a container, then we exit because something is up. If the container needed to be pulled, you might see the pull output print to the console after a pause.
Given we have a container, the script is going to set up port forwarding to ensure that the display from the node on Sherlock is forwarded to your computer.
== Setting up port forwarding ==
ssh -L 43453:localhost:43453 sherlock ssh -L 43453:localhost:43453 -N sh-02-21 &
...
Connecting means that we have the node, and the job has been issued that will obtain and start the container.
Important if you need to pull the container, it might not be ready when the port forwarding starts, so you should look at the logs to determine when it is, and then go to the port.
At this point the script is conservative, and (again) assumes that something might go wrong. In a perfect world, things wouldn’t. But as researchers we know that bugs happen, and instead of pretending that they don’t, we should be prepared by knowing how to debug. Singularity isn’t perfect and has issues with pulling and running sometimes. For this case, the tool (again) tells you exactly how to look at error and output logs, from a terminal on your local machine:
== View logs in separate terminal ==
ssh sherlock cat /home/users/vsochat/forward-util/singularity-notebook.sbatch.out
ssh sherlock cat /home/users/vsochat/forward-util/singularity-notebook.sbatch.err
This is how you should debug if there are issues, and send the output to your research computing support for help!
Finally, you can follow the instructions to open your browser!
== Instructions ==
1. Password, output, and error printed to this terminal? Look at logs (see instruction above)
2. Browser: http://sh-02-21.int:56845/ -> http://localhost:56845/...
3. To end session: bash end.sh sherlock/singularity-notebook
Please read them :) Note that for some containers, you will need to change the node address to localhost where you
have it forwarded. If you don’t see your password? Issue the ssh command to see it in the log.
Read the messages that we print to you, my dear padwan!
For example, I didn’t see my password, so here is the command I used for this job on Sherlock, and I copy pasted this directly from my terminal:
$ ssh sherlock cat /home/users/vsochat/forward-util/containershare-notebook.sbatch.err
[I 14:53:10.546 NotebookApp] Writing notebook server cookie secret to /tmp/jupyter/notebook_cookie_secret
[I 14:53:12.008 NotebookApp] JupyterLab alpha preview extension loaded from /srv/conda/lib/python3.6/site-packages/jupyterlab
[I 14:53:12.008 NotebookApp] JupyterLab application directory is /srv/conda/share/jupyter/lab
[I 14:53:12.017 NotebookApp] nteract extension loaded from /srv/conda/lib/python3.6/site-packages/nteract_on_jupyter
[I 14:53:12.024 NotebookApp] Serving notebooks from local directory: /scratch/users/vsochat
[I 14:53:12.024 NotebookApp] 0 active kernels
[I 14:53:12.025 NotebookApp] The Jupyter Notebook is running at:
[I 14:53:12.025 NotebookApp] http://sh-02-21.int:56845/?token=4f37bad27eb8015254e00f922774d0af8f3e5f570223bdb0
[I 14:53:12.025 NotebookApp] Use Control-C to stop this server and shut down all kernels (twice to skip confirmation).
[C 14:53:12.025 NotebookApp]

    Copy/paste this URL into your browser when you connect for the first time,
    to login with a token:
        http://sh-02-21.int:56845/?token=4f37bad27eb8015254e00f922774d0af8f3e5f570223bdb0&token=4f37bad27eb8015254e00f922774d0af8f3e5f570223bdb0
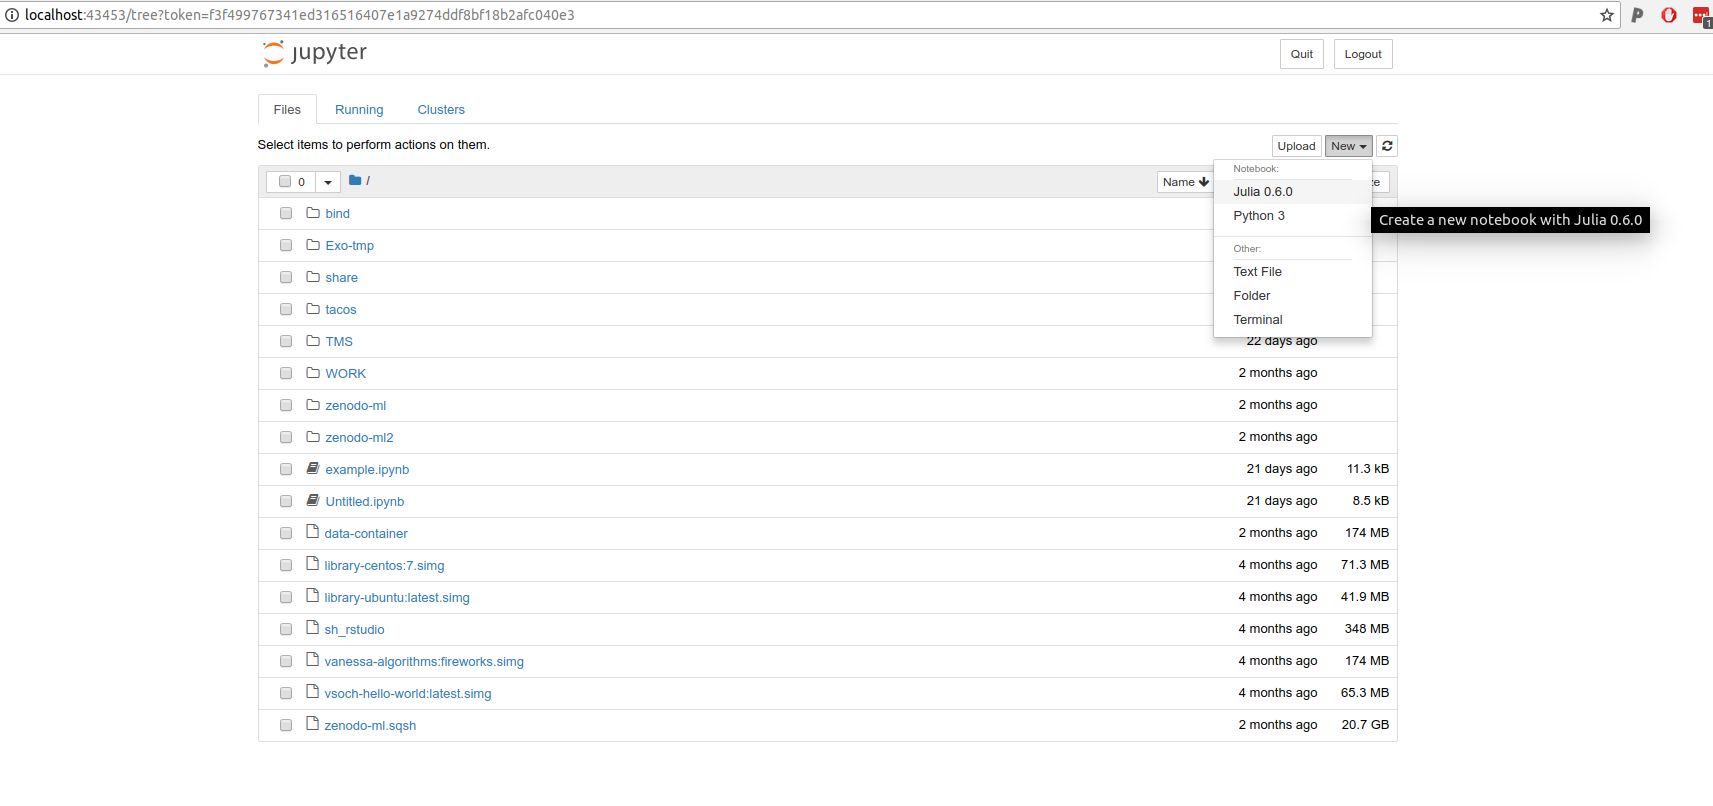
And tada! There it is at the bottom. I would want to copy paste this into my browser and change the sh-02-21 to be localhost as instructed by the “Instructions.” That’s it! Then you have your notebook ready to go :) Note that when I click “new” I can start a new Julia notebook!
Let’s say that you built your own Docker container that runs some kind of notebook. It’s not on the containershare.
How do you use it? You can use a slight variation of the containershare-notebook script, a script called
singularity-notebook.
Docker Hub
An easy solution is to create an automated build (or just push) directly to Docker Hub, and then use an equivalent uri to reference your container.
bash start.sh sherlock/singularity-jupyter docker://<username>/<repository>:<tag>
Container Binary Image
You might have already done this, and then pulled the container to the cluster, and now it’s a file on your scratch. Guess what, you can use that too! On Sherlock we did this:
module use system
module load singularity
export SINGULARITY_CACHEDIR=$SCRATCH/.singularity
singularity pull --name julia.simg docker://vanessa/repo2docker-julia:9ea83b39fd
And now we have the container julia.simg in our $SCRATCH. We can use it with the same tool by specifying the
full path of the container:
bash start.sh sherlock/singularity-notebook /scratch/users/vsochat/.singularity/julia.simg
Singularity Hub
If we were building a recipe from Github on Singularity Hub we
could also use the shub:// uri:
bash start.sh sherlock/singularity-notebook shub://<username>/<repository>:<tag>
Remember that when you are done, you can end the job.
bash end.sh sherlock/singularity-notebook
This is all under development, and guided by your needs! If you have an issue, I’ll help you fix it. If you have an idea for a new container, I’ll build it for you. If you otherwise have questions or want another tutorial? Please reach out!
1: Note that “singularity-jupyter” is mostly the same as “singularity-notebook” but it has a pre-built container on @vsoch scratch space, whereas singularity-notebook expects you to provide the path or unique resource identifier for the container.
2: A script called “singularity-notebook” might exist for the sherlock and farmshare clusters, and have a general version, and we would look under “sherlock” first given that it’s the resource you’ve defined in your params.sh, then look
up one level.
This series guides you through getting started with HPC cluster computing.
Slurm Manage, for submitting and reporting on job arrays run on slurm
A Quick Start to using Singularity on the Sherlock Cluster
Use the Containershare templates and containers on the Stanford Clusters
A custom built pytorch and Singularity image on the Sherlock cluster
Use Jupyter Notebooks via Singularity Containers on Sherlock with Port Forwarding
Use R via a Jupyter Notebook on Sherlock
Use Jupyter Notebooks (optionally with GPU) on Sherlock with Port Forwarding
Use Jupyter Notebooks on Sherlock with Port Forwarding
A native and container-based approach to using Keras for Machine learning with R
How to create and extract rar archives with Python and containers
Getting started with SLURM
Getting started with the Sherlock Cluster at Stanford University
Getting started with the Sherlock Cluster at Stanford University
Using Kerberos to authenticate to a set of resources